Installation guide
Step-by-step cattle guard install.
All eight steps are listed below. Click any step to open the full image and instruction details.
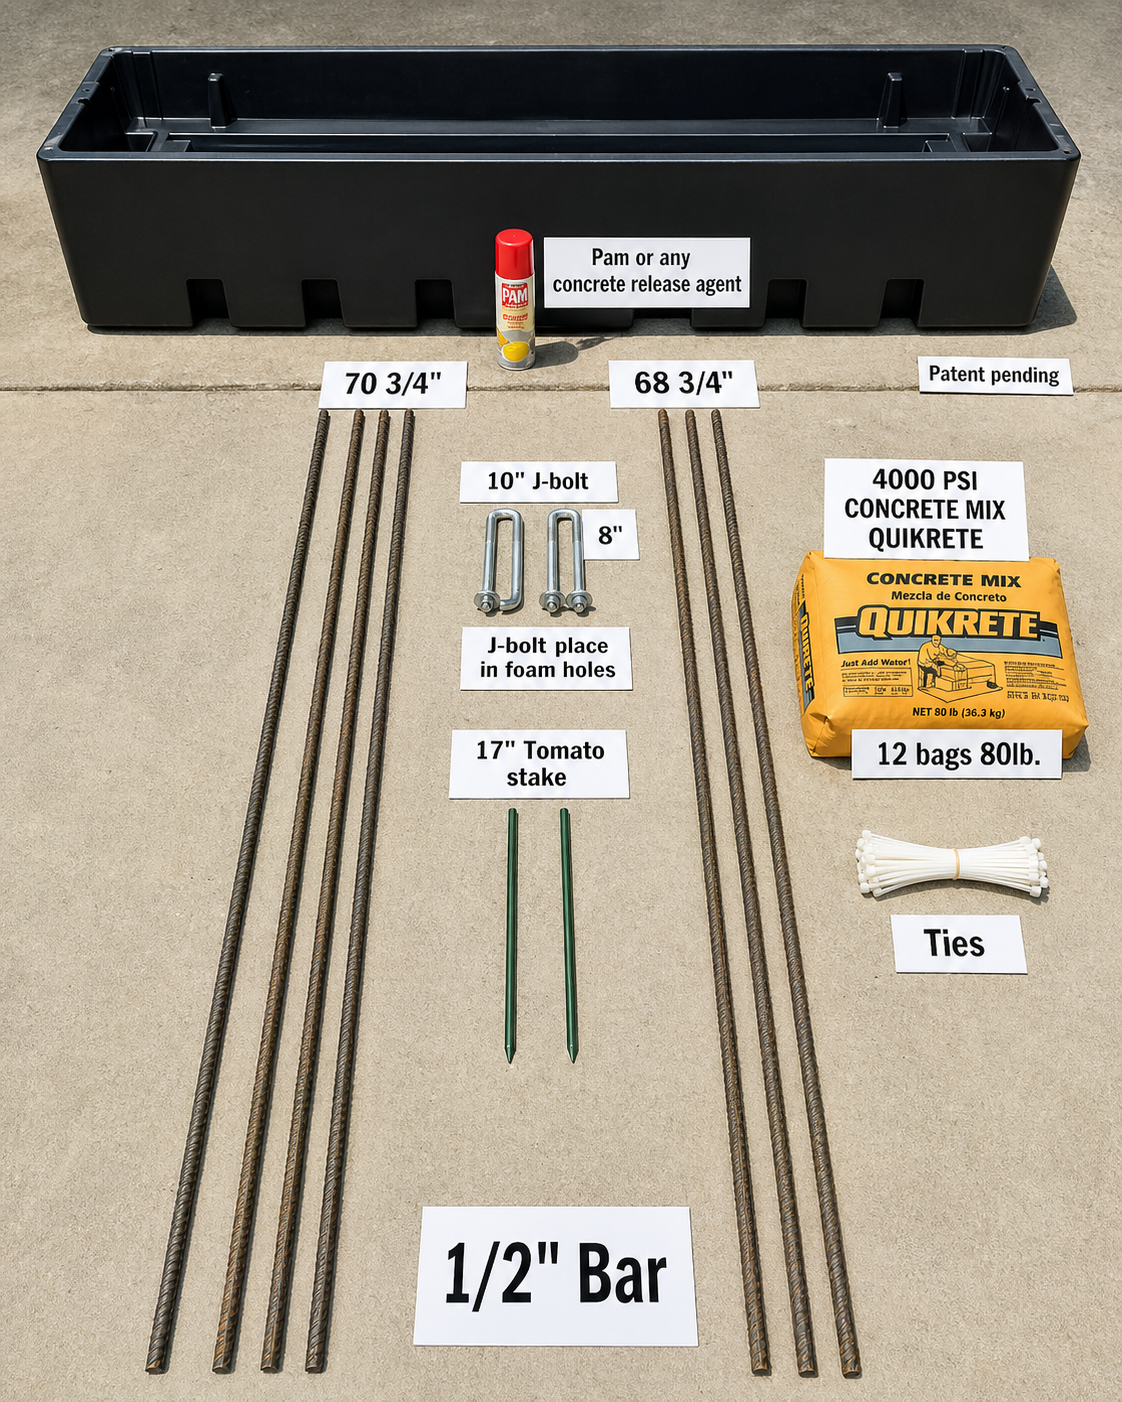
Material list
What you need for each pour
- Concrete release agent or grease for the inside of the form
- Two 20-foot bars of 1/2-inch rebar cut to the required lengths
- Two tomato stakes, each 17 inches long, for cross members
- Two 10-inch J-bolts for lifting while removing from the form
- Two 8-inch J-bolts for lifting and placing the finished section
- 12 bags of 80 lb, 4000 PSI concrete mix per pour
- Tie wire or plastic zip ties for fastening rebar and hardware
Process
All 8 installation steps.
 1
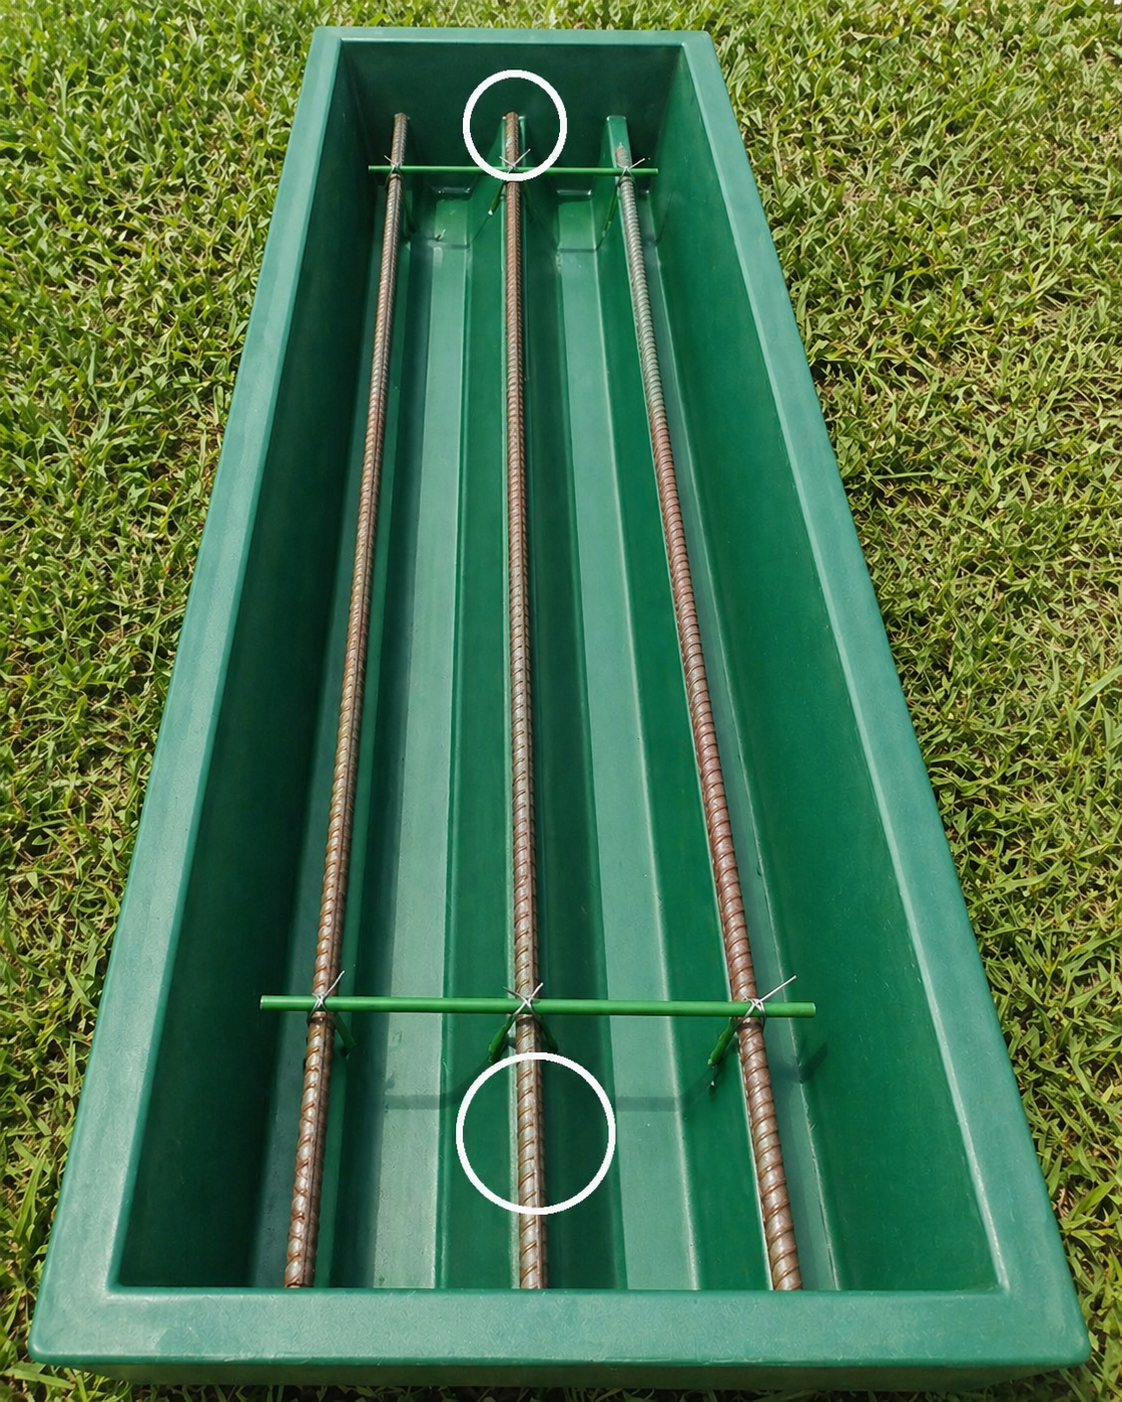
1Prep the Form
Apply concrete release agent inside the reusable form. Set the rebar, tomato stakes, J-bolts, and tie wire according to the reinforcement plan before pouring.
+
Prep the Form
Apply concrete release agent inside the reusable form. Set the rebar, tomato stakes, J-bolts, and tie wire according to the reinforcement plan before pouring.
Step 1
Prep the Form
Apply concrete release agent inside the reusable form. Set the rebar, tomato stakes, J-bolts, and tie wire according to the reinforcement plan before pouring.
 2
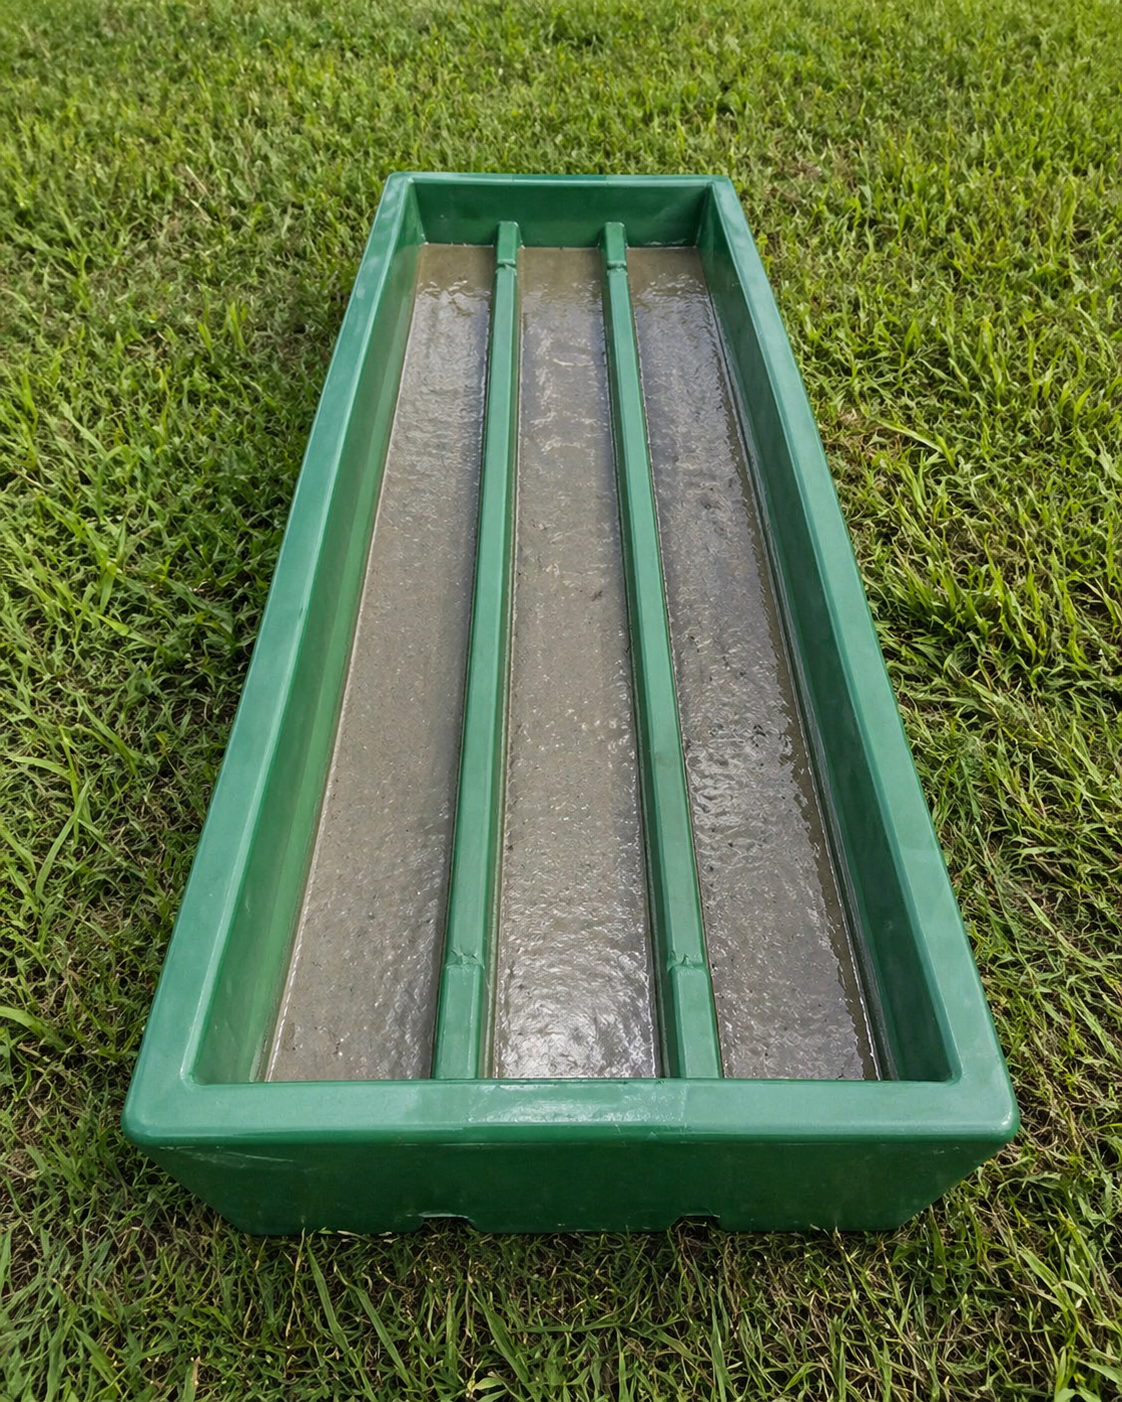
2Pour 4000 PSI Concrete
Pour 4000 PSI concrete into the form evenly. Work the mix around reinforcement, corners, and anchor points to reduce voids and keep the finished section consistent.
+
Pour 4000 PSI Concrete
Pour 4000 PSI concrete into the form evenly. Work the mix around reinforcement, corners, and anchor points to reduce voids and keep the finished section consistent.
Step 2
Pour 4000 PSI Concrete
Pour 4000 PSI concrete into the form evenly. Work the mix around reinforcement, corners, and anchor points to reduce voids and keep the finished section consistent.
 3
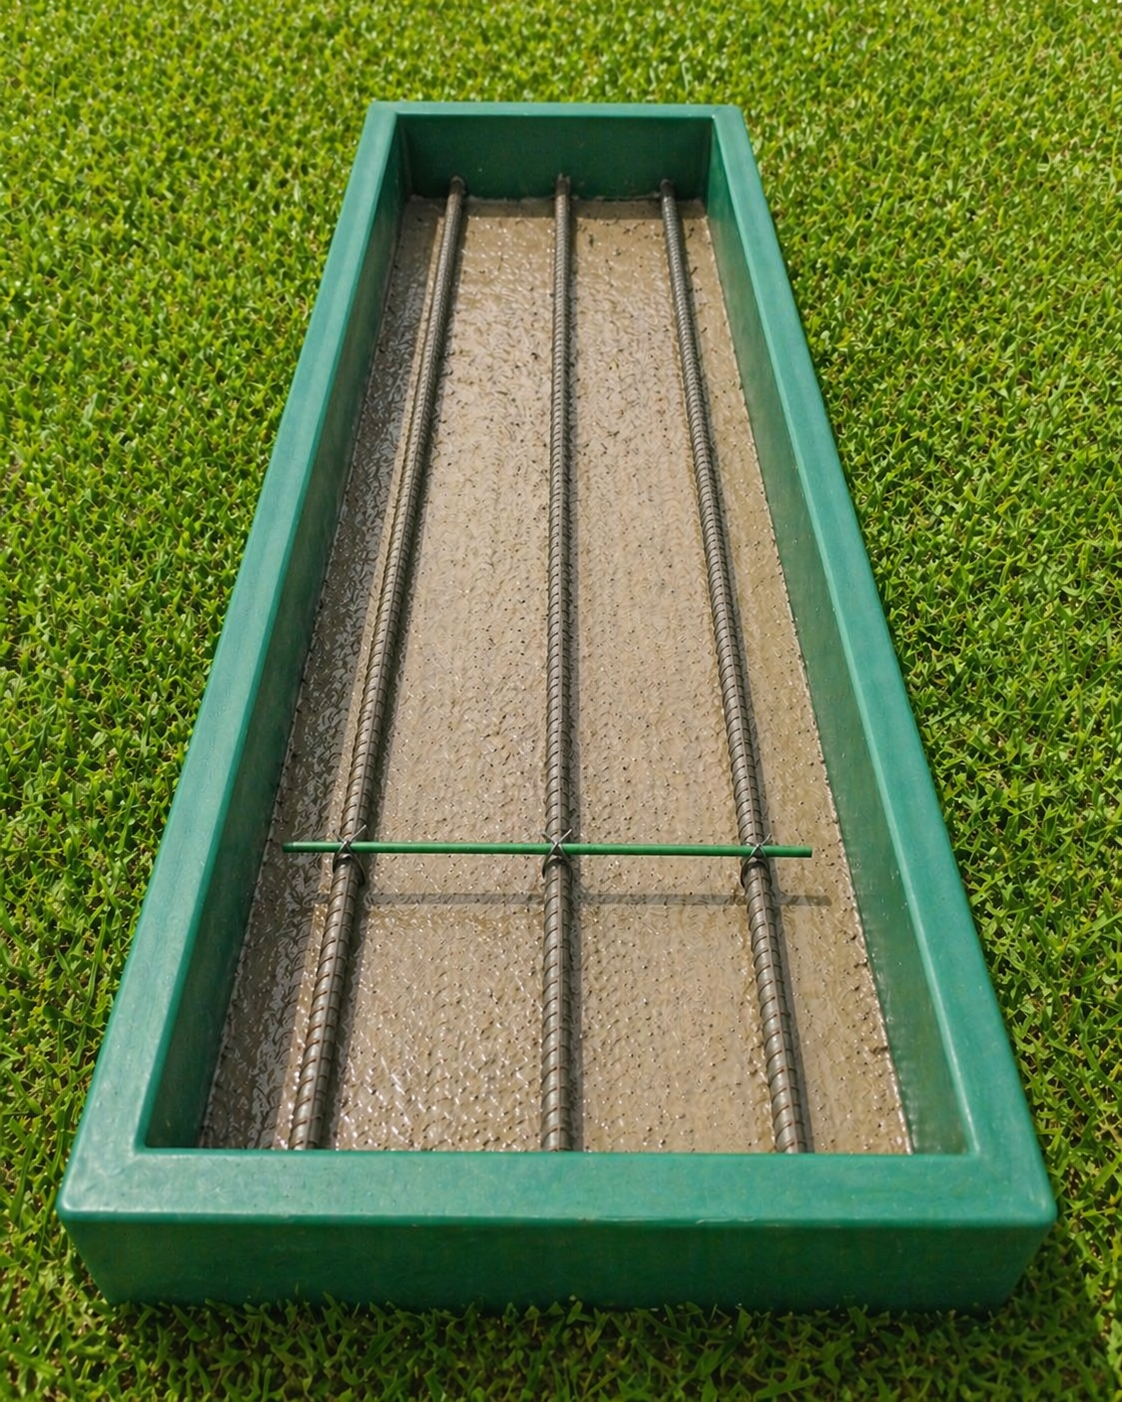
3Settle, Level, and Cure
Tap or vibrate the form to release trapped air, strike off the top surface, and let the concrete cure undisturbed. Curing time depends on temperature and humidity.
+
Settle, Level, and Cure
Tap or vibrate the form to release trapped air, strike off the top surface, and let the concrete cure undisturbed. Curing time depends on temperature and humidity.
Step 3
Settle, Level, and Cure
Tap or vibrate the form to release trapped air, strike off the top surface, and let the concrete cure undisturbed. Curing time depends on temperature and humidity.
 4
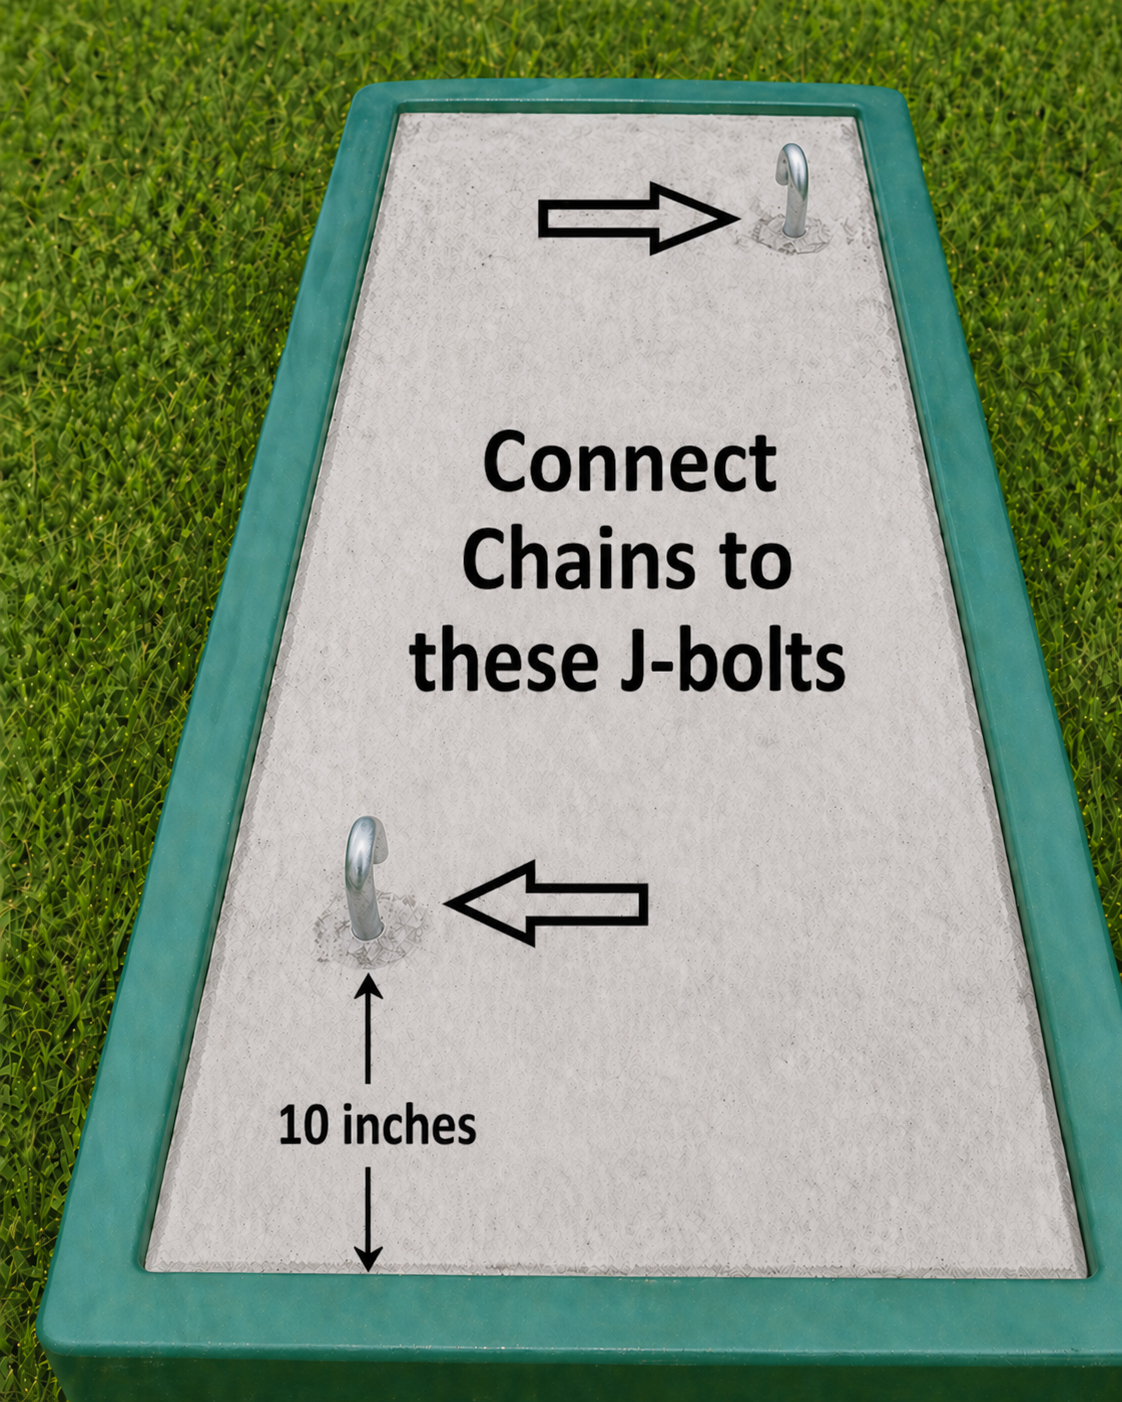
4Install J-Bolts and Cure
While the concrete is still plastic, insert the J-bolts at the designated anchor points. Check alignment and depth before the concrete sets. Allow the concrete to cure undisturbed before removal.
+
Install J-Bolts and Cure
While the concrete is still plastic, insert the J-bolts at the designated anchor points. Check alignment and depth before the concrete sets. Allow the concrete to cure undisturbed before removal.
Step 4
Install J-Bolts and Cure
While the concrete is still plastic, insert the J-bolts at the designated anchor points. Check alignment and depth before the concrete sets. Allow the concrete to cure undisturbed before removal.
 5
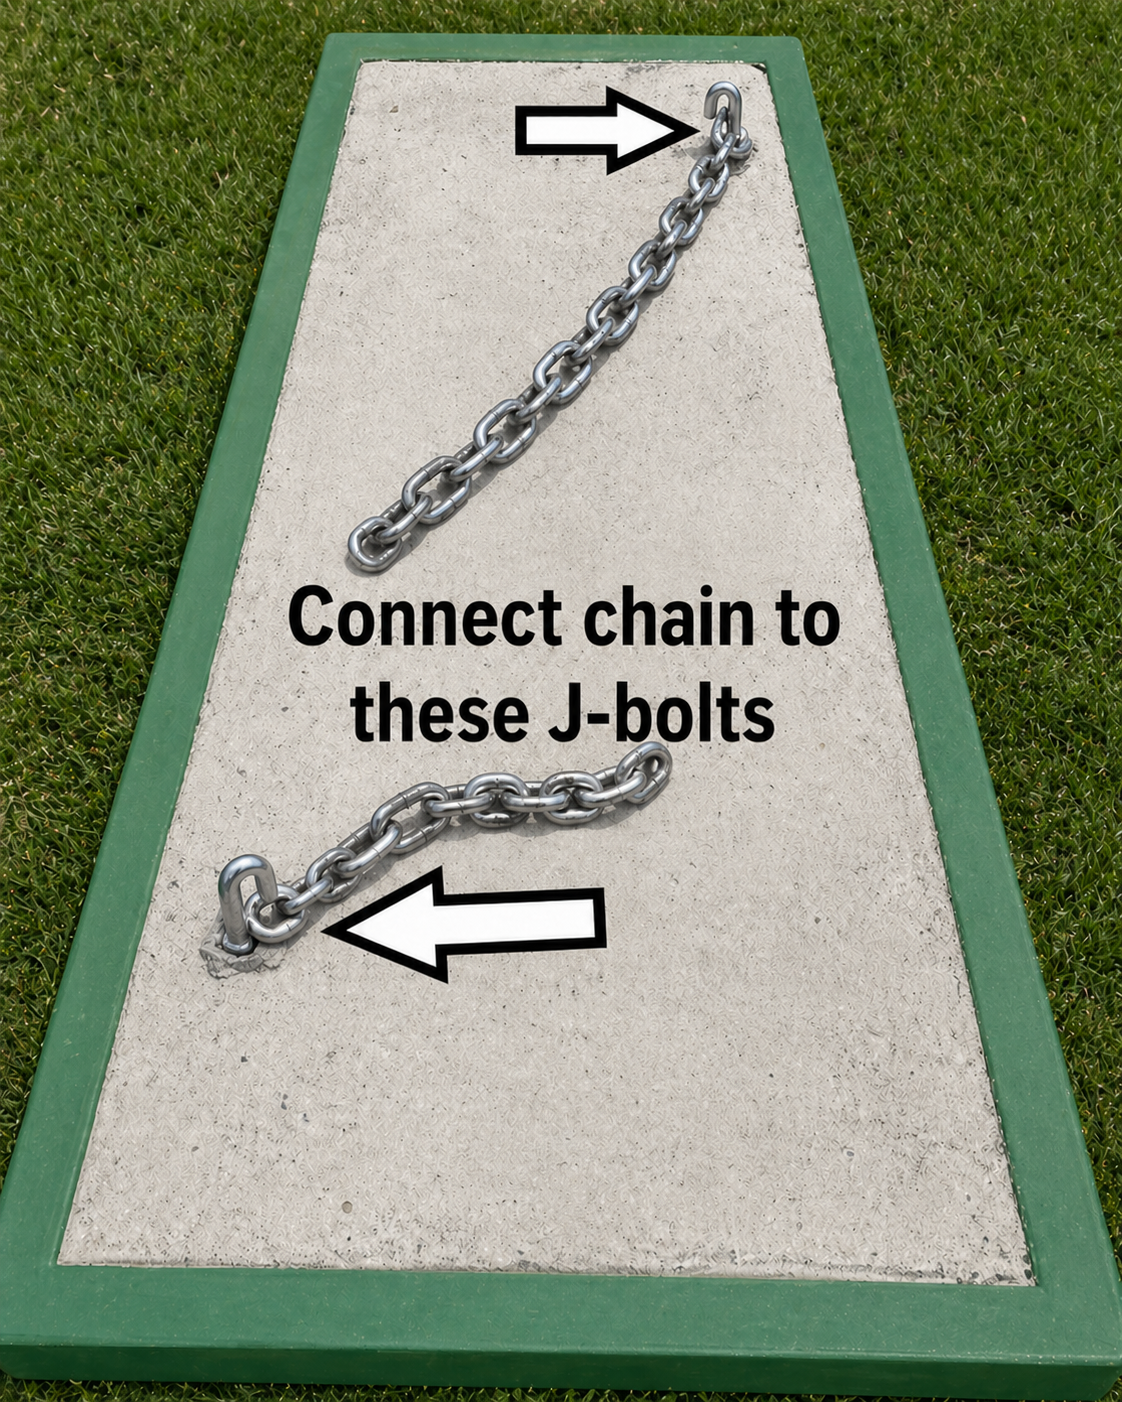
5Attach Chain to J-Hooks
Once the concrete is cured, attach lifting chains or slings securely to the J-hooks. Confirm that the load is balanced evenly before lifting.
+
Attach Chain to J-Hooks
Once the concrete is cured, attach lifting chains or slings securely to the J-hooks. Confirm that the load is balanced evenly before lifting.
Step 5
Attach Chain to J-Hooks
Once the concrete is cured, attach lifting chains or slings securely to the J-hooks. Confirm that the load is balanced evenly before lifting.
 6
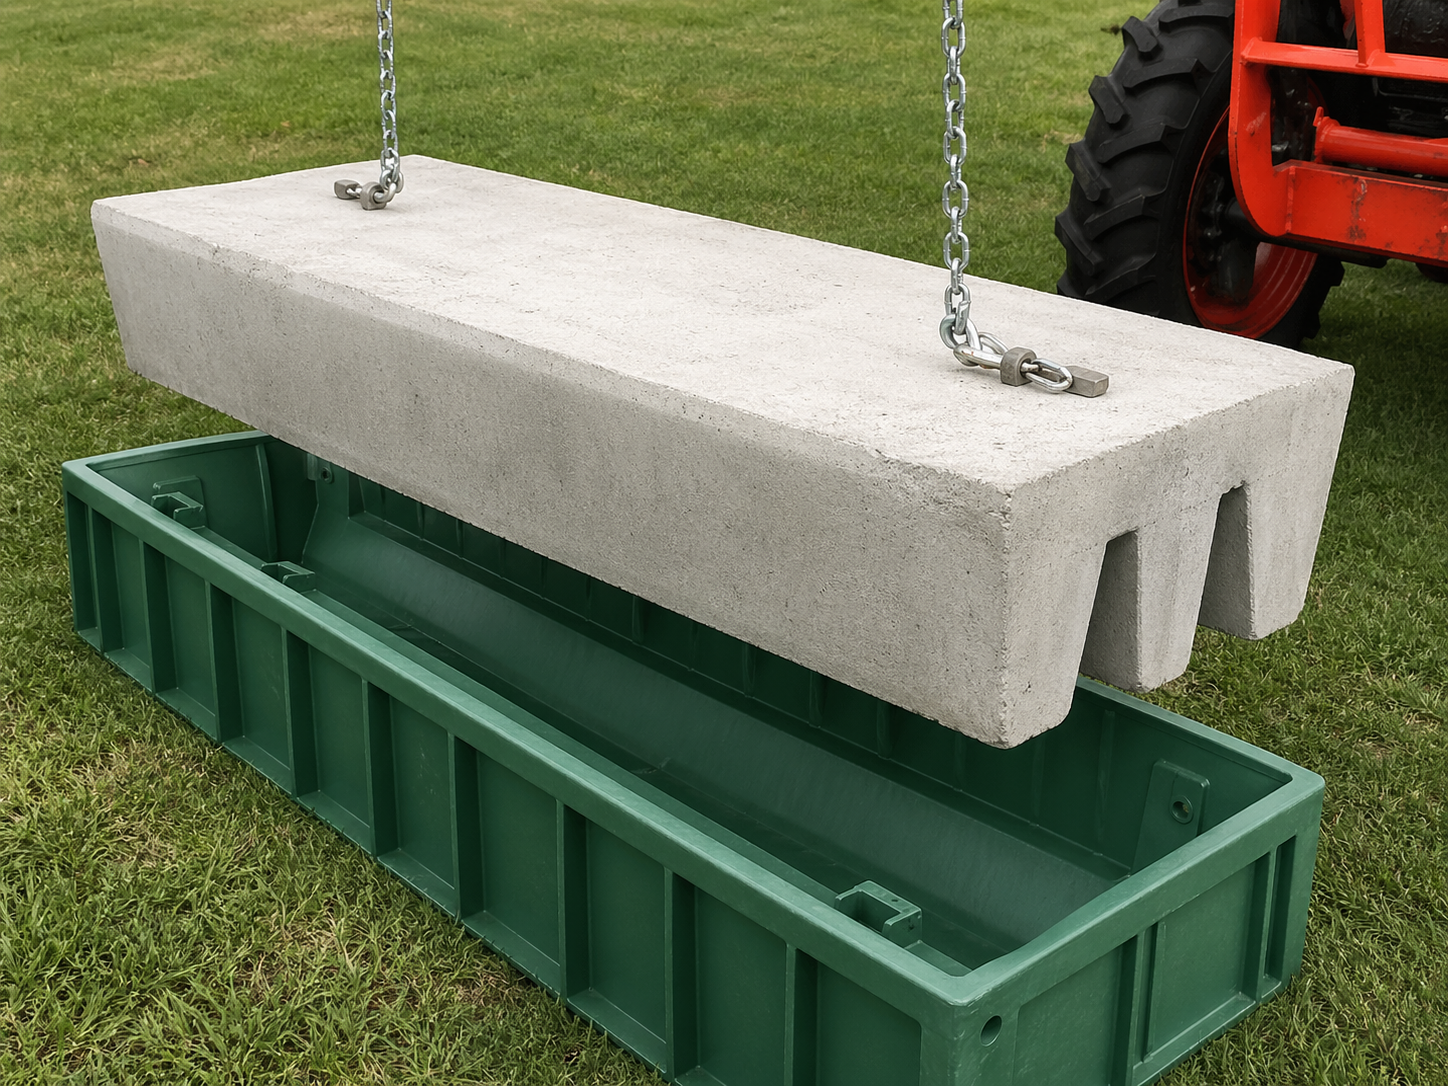
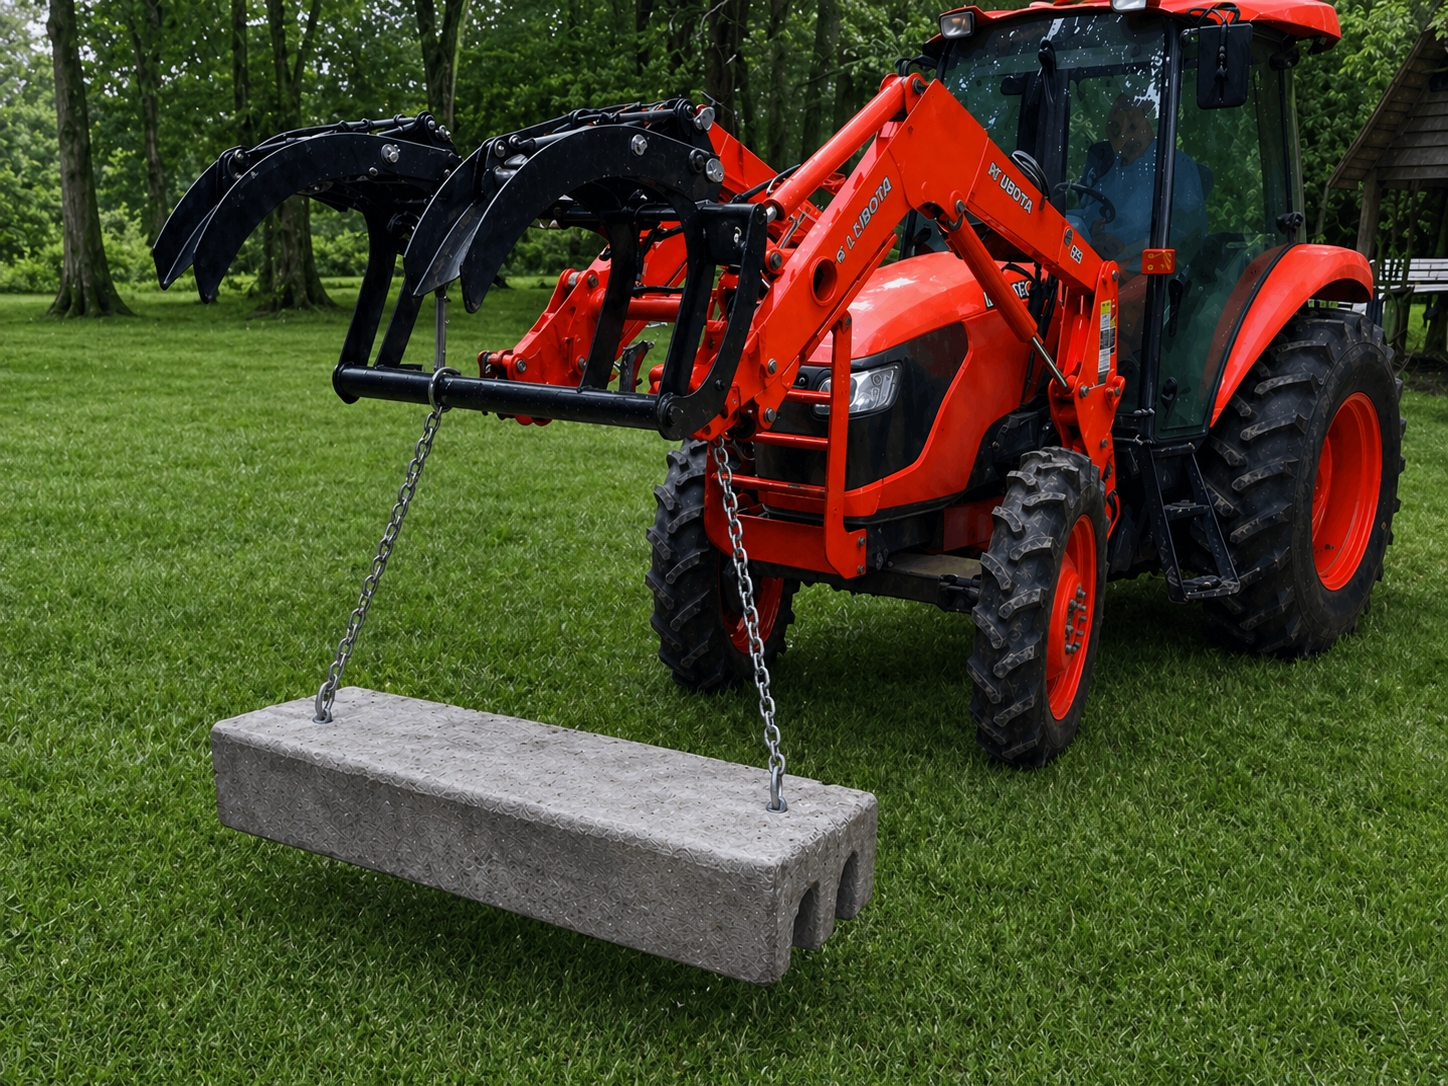
6Lift From the Form
Using a loader, forklift, tractor, or crane, carefully lift the cured cattle guard out of the form. Avoid twisting, sudden jerks, or uneven lifting.
+
Lift From the Form
Using a loader, forklift, tractor, or crane, carefully lift the cured cattle guard out of the form. Avoid twisting, sudden jerks, or uneven lifting.
Step 6
Lift From the Form
Using a loader, forklift, tractor, or crane, carefully lift the cured cattle guard out of the form. Avoid twisting, sudden jerks, or uneven lifting.
 7
7Prepare Site and Place
Choose a level, well-drained location aligned with the roadway or gate. Compact the base, use gravel as needed, then set the cattle guard square and level.
+
Prepare Site and Place
Choose a level, well-drained location aligned with the roadway or gate. Compact the base, use gravel as needed, then set the cattle guard square and level.
Step 7
Prepare Site and Place
Choose a level, well-drained location aligned with the roadway or gate. Compact the base, use gravel as needed, then set the cattle guard square and level.
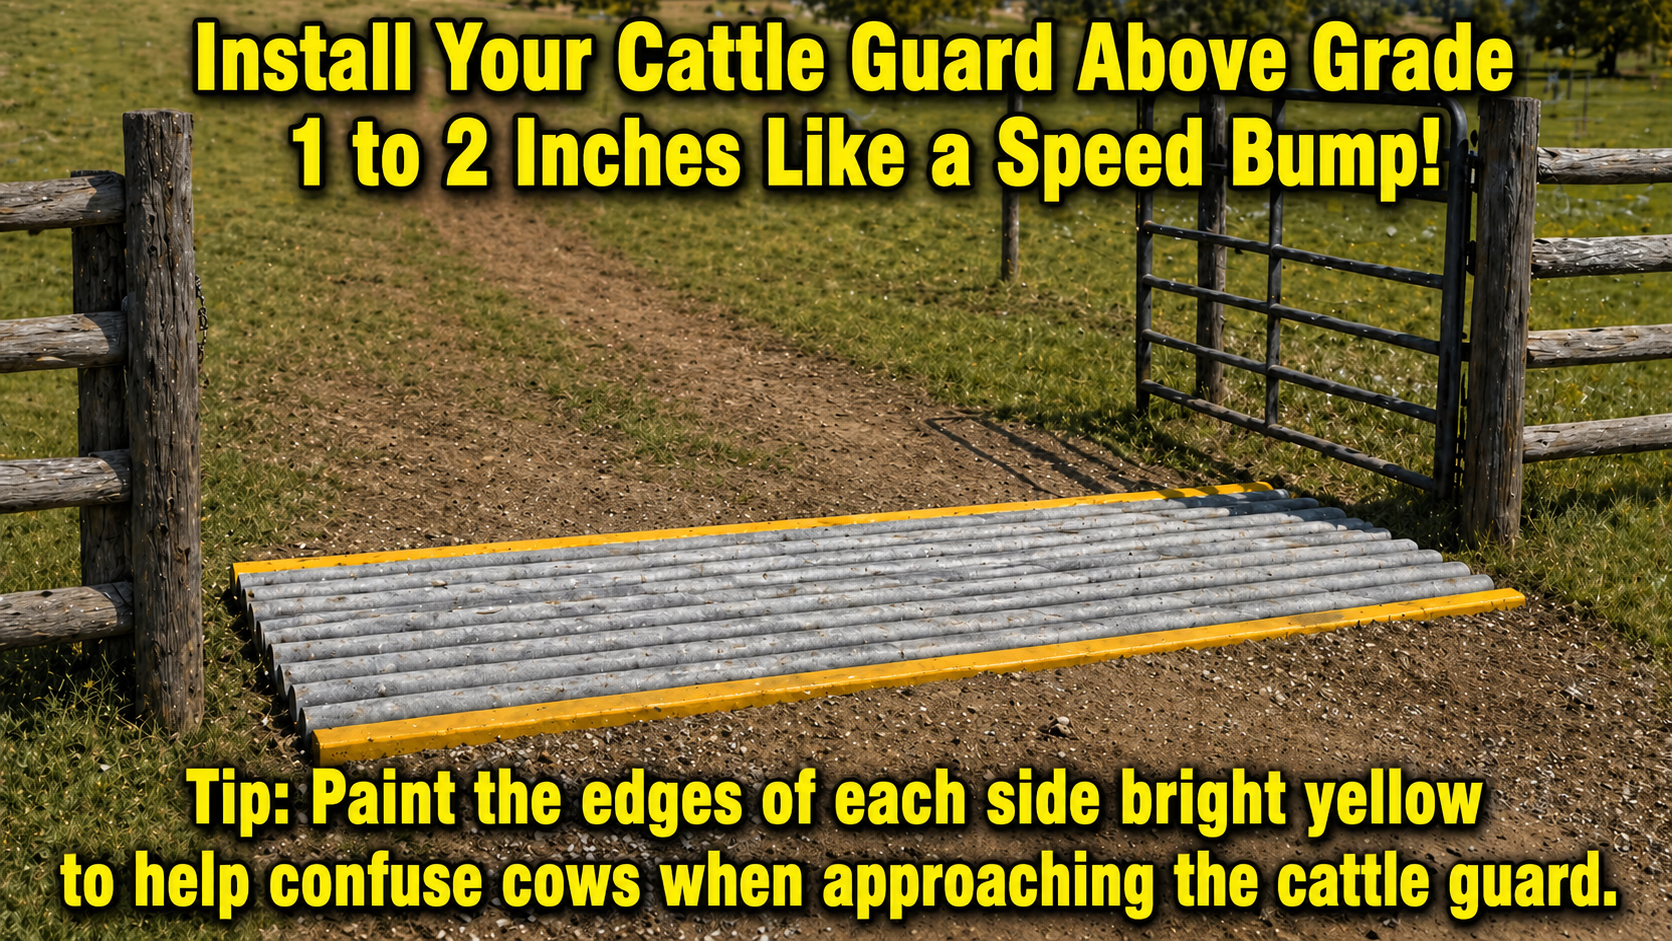 8
8Backfill, Grade, and Inspect
Backfill around the cattle guard, grade the approach so vehicles transition smoothly, and confirm the unit is level, stable, and clear of loose debris before opening the crossing to traffic.
+
Backfill, Grade, and Inspect
Backfill around the cattle guard, grade the approach so vehicles transition smoothly, and confirm the unit is level, stable, and clear of loose debris before opening the crossing to traffic.
Step 8
Backfill, Grade, and Inspect
Backfill around the cattle guard, grade the approach so vehicles transition smoothly, and confirm the unit is level, stable, and clear of loose debris before opening the crossing to traffic.
Video guide
Watch the installation walkthrough.
Use the video with the step list above to plan the pour, lifting process, site preparation, final placement, grading, and inspection.
Open on YouTube